

Your Charleston Area Senior Portrait Prep Guide
Everything you need to prepare for your upcoming session and so you can shine.
Hey gorgeous! I'm so excited for your senior portrait session! This guide will walk you through everything you need to know to feel confident, prepared, and ready to create some magic together.
How to Use This Guide:
First Time Reading? Read through the entire guide to get the full picture and understand all the elements that go into creating amazing senior portraits.
Coming Back for Quick Reference? Jump straight to the timeline that's most helpful for you right now.

2-3 MONTHS PRIOR TO YOUR SESSION:
Make It Personal & Bring Your Story to Life
Your senior portraits aren't just photos—they're snapshots of this incredible chapter in your life!
Start thinking about the what, where, and who that will make your session uniquely yours.
1. Location Ideas to Consider:
A favorite location
The beach
Your school campus (if allowed)
Downtown Charleston's
Gardens or Parks
2. Get Inspired & Start Planning:
Browse my senior portrait portfolio for location ideas that speak to you
Create a Pinterest board with your favorite poses, outfits, and color schemes
Think about what makes you you—your hobbies, style, personality
Who do you want to include: family, a friend, your pet.
Consider meaningful props: an instrument, sports gear, favorite books, or meaningful personal items.
3. Let's Chat:
After you’ve submitted your questionnaire I will reach out so we can talk this all through. Share your Pinterest board or inspiration photos with me! The more you tell me about your vision, the more we can customize your session to be perfectly you.
1-2 MONTHS PRIOR TO YOUR SESSION:
Build Your Dream Looks &
Curate Your Stunning Wardrobe
The Style Formula:
Personality + Fit + Movement + Color + Location = Perfect Portraits
1. PERSONALITY
Choose 2-3 outfits that represent different sides of you:
Casual & Relaxed: Your favorite jeans, shorts or skirt and that top that makes you feel amazing
Dressed Up: Something that makes you feel like the queen you are
Timeless Classic: Simple, elegant pieces that will look amazing in 20 years
2. FIT
Well-fitted and flattering
Try on everything with the proper undergarments well in advance
Make sure you can sit, move, and pose comfortably
Avoid anything that rides up or shifts around
Strapless bras for off-shoulder looks
Seamless options under fitted clothes
3. LAYERS & ACCESSORIES
Create variety without full outfit changes:
Jean jackets and cardigans you can add/remove
Statement jewelry that transforms a look
Rings and necklaces are great because they give a job to your hands
Scarves, hats, and hair accessories even shoes or boots
Belts to define your waist and change silhouette
4. MOVEMENT
Flowy fabrics photograph beautifully:
Maxi skirts that twirl
Dresses that catch the Charleston breeze
Anything that adds natural, graceful movement
5. SELECT YOUR BEST COLORS
A Four Step Guide
Your undertone affects how the colors you wear will make your skin look. The right colors will make you glow and the wrong colors will make your skin and complexion look dull.
Step 1: Try these quick tests in natural light:

-
Gold looks better? You have warm undertones
Silver looks better? You have cool undertones
Both look good? ➝ Neutral undertone
-
Blue or purple veins? Cool undertones
Green veins? Warm undertones
Hard to tell? You’re likely neutral (and most colors work!)
-
Hold a bright white shirt (pure white/printer paper white (cool white) next to your face.
Skin looks rosy or pink? Cool undertones
Skin looks yellowish? Warm undertones
Can’t tell? Likely neutral
-
Head to Sephora or Ulta. They can help confirm your undertone and match your foundation.

Step 2: Choose Your Best Colors Based on Your Undertone
-
Coral - From soft peachy-coral to vibrant orange-coral, these colors bring out the golden glow in your skin
Peach - Light peach to deep apricot shades complement your warm base beautifully
Mustard - Rich, golden yellows that echo the warm undertones in your skin
Warm Greens - Olive, forest green, sage, army green, or any green with yellow undertones (avoid cool mint or emerald greens)
Brown - Chocolate, cognac, camel, tan, warm beige, or rich espresso - these earthy tones are naturally harmonious with warm skin
Cream - Warm, buttery off-whites and ivory shades (not stark cool whites)
Plus: Warm reds (tomato, brick red), golden oranges, warm purples (plum, eggplant), and any color that leans toward the yellow side of the color wheel.
-
Jewel Tones - Sapphire blue, emerald green, amethyst purple, ruby red - these rich, saturated colors with blue undertones make your skin look luminous
Cherry Red - True reds and berry reds with blue undertones (not orange-reds or tomato reds)
Magenta - Hot pink, fuchsia, and pink with blue undertones that complement your cool base
Icy Blues - Cool blues like royal blue, navy with blue undertones, periwinkle, powder blue, or any blue that leans toward the purple side
Silver - Cool metallic tones and gray-based colors
Charcoal - Cool grays, slate, and deep gray-blues
Plus: Cool purples (lavender, violet), emerald and mint greens, cool pinks (rose, dusty pink), pure white, black, and any color that leans toward the blue side of the color wheel. These colors enhance your natural cool undertones and make your skin appear bright and clear.
-
Most colors - You hit the jackpot! You can pull off both warm and cool colors beautifully.
Just avoid extremes:
Very warm colors - Bright orange, golden yellow, warm coral, or anything that screams "super warm"
Very cool colors - Icy blues, true fuchsia, stark cool pinks, or anything that's intensely cool
What works best for you: Colors that are more balanced and muted - soft versions of both warm and cool colors, or colors that don't lean heavily in either direction. Think dusty rose instead of hot pink, sage green instead of bright lime, or navy instead of electric blue.
Your sweet spot: Medium-toned colors that aren't shouting "I'M WARM!" or "I'M COOL!" - you look amazing in the colors that live in the middle ground.
Good News: You Don't Have to Avoid Half the Rainbow!
Every single color comes in both warm AND cool versions - you just need to know what to look for!
Real-life shopping tip: When you're out shopping, grab both versions of a color you like - for example, hold up a warm golden yellow AND a cool lemon yellow to your face in the mirror. One will make your skin glow while the other will make you look tired. The flattering one is your perfect shade.

If you have WARM undertones, here's how to wear "cool" colors:
Blue Examples:
Skip: Bright royal blue or electric blue
Choose: Navy blue, denim blue, teal with green hints, or dusty blue
Purple Examples:
Skip: Bright violet or lavender
Choose: Deep plum, eggplant, or burgundy-purple
Green Examples:
Skip: Mint green or emerald
Choose: Olive green, army green, or forest green
If you have COOL undertones, you can totally wear "warm" colors too:
Red Examples:
Skip: Orange-red or brick red
Choose: Cherry red, crimson, or berry red (think cranberry!)
Yellow Examples:
Skip: Golden yellow or mustard
Choose: Lemon yellow, icy butter yellow, or pale yellow (think highlighter yellow vs. school bus yellow)
Orange Examples:
Skip: Pumpkin orange or burnt orange
Choose: Coral (orange with pink mixed in), peach, or salmon

Step 3: Factor in Hair + Eye Color
Hair Color = Color Depth (choose the right intensity based on your natural coloring)
Blonde → Softer, lighter shades that won't overpower you
Brunette → Bold, rich tones that match your natural depth
Red → Greens and blues shine, earth tones complement beautifully
Black → Vibrant, saturated colors pop against your dramatic coloring
Contrast Level = Color Boldness
High contrast (dark hair + light eyes) → Bold, dramatic colors work well - you can handle intense shades
Low contrast (light hair + light eyes) → Soft, muted shades are best - they harmonize with your gentle coloring
The key: Match your clothing's color intensity to your natural coloring intensity. If your natural coloring is soft and light, choose softer colors. If your natural coloring is deep and dramatic, you can wear bolder, more saturated colors.
Step 4. Match Your Style and Colors to Your Setting:
Beach/Waterfront: Soft blues, corals, creams, off whites work beautifully and complement the setting. More casual vibes work great here - think flowy dresses and skirts that look amazing in the ocean breeze, and don't worry if you get a little windblown or wet!
Downtown/Urban: Bold colors, patterns, edgier styles - you can dress it up more here and there's lots of flexibility with your look.
Parks/Gardens: Avoid green and navy blue (you'll blend in!), try warm tones instead to stand out against all that greenery.
Historic Areas: Classic, timeless pieces and colors complement the beautiful architecture
Pay Attention to Compliments: If people always say "that color looks amazing on you," there's actually science behind it! Your friends and family instinctively notice when colors make you glow. Wear more of those colors!

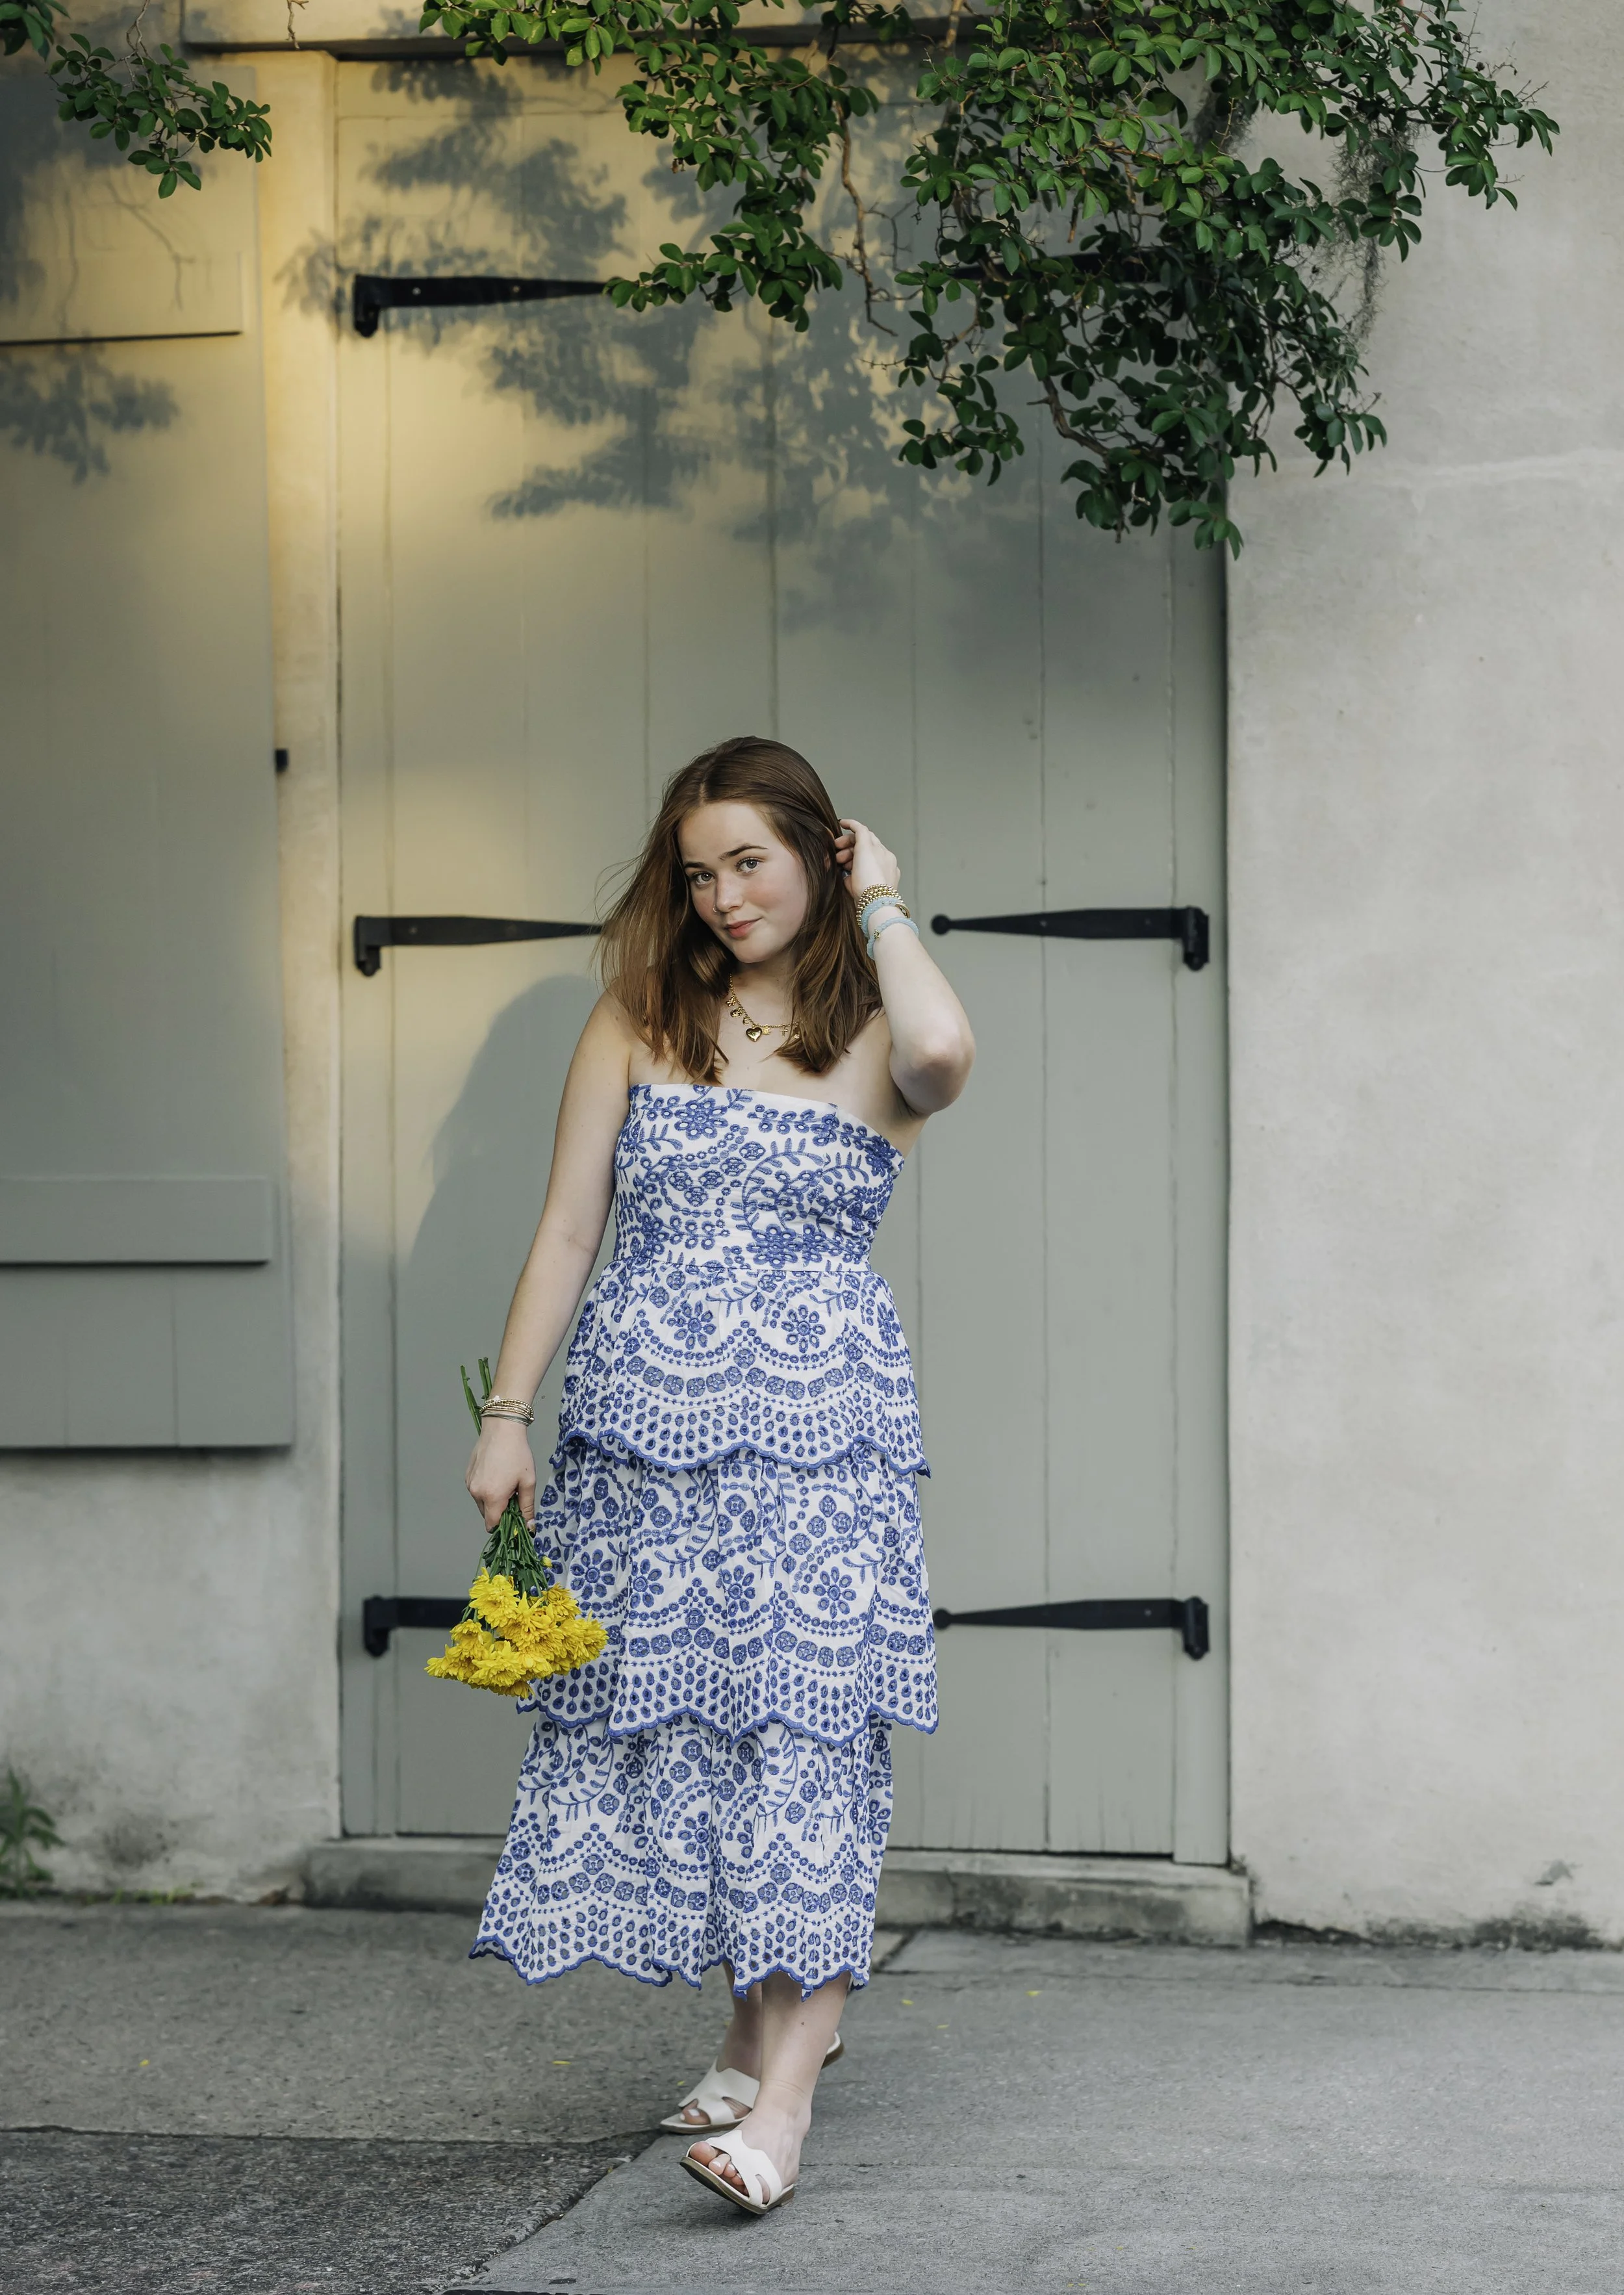
Finding the Perfect White Dress for Your Senior Session
White dresses are a timeless choice for senior portraits, but here's the plot twist – "white" isn't actually just white! There are more shades of white than there are coffee orders at Starbucks? You'll want to avoid stark, bright white (think copy paper white) that can wash you out or create harsh contrasts in photos. Instead, opt for one of the approximately 47,000 other white options that photograph beautifully and complement your skin tone.
Best White Shades for Photos (Yes, They're All Different):
For cool undertones: Winter white, whites with subtle gray undertones, or crisp whites that aren't blindingly bright
For warm undertones: Ivory, cream, champagne, off-white, or eggshell - like white, but with a whisper of "I'm not trying too hard"
For either undertone: Pearl or oyster white (because apparently even shellfish get their own white shade) - these neutral whites work beautifully on most skin tones
Style Tips: Consider dresses with texture, lace details, or flowing fabrics that add visual interest without competing with your natural beauty. Avoid anything too tight or restrictive since you'll be moving and posing throughout the session.
Keep in mind that your white dress will pick up and reflect the colors of your surroundings like a fashionable chameleon. If we’re shooting near green foliage or colorful backgrounds, these tones can cast subtle color shifts onto pure white fabric. Softer white tones are more forgiving and maintain their beauty even when Mother Nature tries to photobomb your outfit.
What to Avoid: Skip ultra-stark whites (printer paper white) or anything with undertones that clash with your skin tone, as these can appear harsh in natural lighting and work against your beauty.
The goal is to choose a white that enhances your natural glow – even if it takes you longer to pick the "white" than it does to actually take the photos!

Need Shopping Inspiration?
I have a curated list of my go-to spots - both online favorites and local Charleston gems that are perfect for finding portrait-worthy pieces.
AQH Comprehensive Shopping Guide
Plus, check out my Pinterest board for outfit inspiration and styling ideas to get your creative juices flowing!
Follow my Senior Portrait Style Pinterest Board
Need recs for hair and make-up? Reach out and I’ll gladly share some trusted local artists I’ve worked with who will help you look and feel your best.
Clothing to Avoid
-
You'll look tense in photos
Try well-fitted, comfortable pieces instead
-
They are distracting from your beautiful face
Go for strapless style bathing suits leading up to your session
-
Awkward when sitting/posing
Midi lengths or longer work much better
-
Create weird effects in camera
Stick to solid colors or large, simple prints
-
Wrinkles the second you put it on
Cotton blends or knits stay looking fresh
-
These colors do not photograph well against most skin tones
Rich, saturated colors, deeper pastels and jewel tones are gorgeous on camera
-
Too stark for portraits → Soft neutrals with pops of color are much more flattering
These non-colors are too stark for portraits
Avoid "printer paper" white
For whites, opt for creamy soft whites
If you love black, save it for maybe 1 of your 3 outfits and pair it with colorful accessories or a pop of color
Wardrobe Check: Lay everything out, try it all on with accessories, and take photos if you want my opinion!
I'm always here to help you feel confident and amazing.

1 WEEK PRIOR TO YOUR SESSION:
Fine-Tune the Details & Beauty Prep Timeline
Mindful Sun Exposure
Avoid excessive sun exposure before your session to prevent redness, peeling, or sunburn—all of which can be difficult to edit and may affect your confidence during the shoot.
If you want a spray tan, book it 3-4 days out (keep it natural and subtle!) - and don't try spray tanning for the first time before your session. Know your color and what works for your skin.
Hair, Nails & Makeup
Get your haircut or color done now if you haven't already - but don't experiment with a new cut or color! Stick with what you know looks good on you.
Book your mani/pedi for 1-2 days before our session.
Makeup: Try any new makeup looks at least a week in advance, or stick with your trusted routine that makes you feel confident. This isn't the time to experiment with bold new trends!
Final Session Prep
Try on all outfits one more time with full accessories and undergarments and shoes.
Pack your touch-up kit: lip color, powder, small brush.
Invite a “Cheerleader”: parent, friend, or sibling
If family/friends are joining for a few shots, make sure they know to dress nicely too!
1 Day Prior to your Session
Last Minute Prep
Don't Stress Over Blemishes
Minor imperfections are completely normal and can be retouched during editing. Focus on enjoying your Charleston senior photography experience instead.
Pack a Touch-Up Kit
Bring along a few essentials: lip color, powder, blotting paper, and a hairbrush or comb.
Stay Hydrated
Drink at least eight glasses of water daily in the days leading up to your session. Hydrated skin photographs better and gives you a radiant glow in your Charleston senior portraits.
Prep Your Skin the night before: cleanse, moisturize.
Prioritize Rest
A good night’s sleep is your best beauty secret.
Spotless and Ironed Outfits
Make sure your outfits are clean, ironed, and lint and pet hair-free. These small details go a long way in keeping your Charleston senior portraits polished and professional.

SESSION DAY:
Time to Shine!
Give Yourself Plenty of Time to Get Ready
This way you will be relaxed heading into the session.
Eat a good breakfast/meal beforehand
Stay hydrated but don't drink tons of water right before (you don't want to need bathroom breaks!)
Bring Your Favorite Music
If your location allows it, bring a small speaker to play your favorite tunes. Music can help you relax and express yourself more naturally during your senior portrait session.
Apply slightly more makeup than your everyday routine—just enough to enhance your features while maintaining a fresh, natural look.
Use a bit more blush than usual
Define your eyes with mascara and/or eyeliner
Choose lip colors that complement your outfit colors
Set everything with powder to prevent shine
Make sure you have everything ready:
Complete your touch-up kit with essentials
Gather all outfit pieces (clothes, undergarments, accessories, and shoes)
Most Importantly- Love Yourself
Reaching this milestone is something to celebrate! Trust the photography process, and know that I’m here to guide you every step of the way.
Don't Stress the Small Stuff!
That tiny blemish? I'll take care of it in editing
Feeling nervous? Totally normal—I'll help you relax!I’ll help you look and feel your best—capturing your true personality and style in every frame.
Stay on track with this complete senior session checklist - from outfit planning to day-of reminders!

posing tips
The 4-Step Posing Method:
1. SPINE STRAIGHT Stand tall, gently engage your core. Instant confidence boost!
2. ANGLE YOUR BODY Turn about 45° to the camera. This adds gorgeous depth and flatters your lines.
3. TRANSFER YOUR WEIGHT Shift weight to one leg for a relaxed stance. Lean slightly forward from your waist.
4. ASYMMETRY Focus on having your hands and feet on different planes - vary your shoulder angles, hand positions, and foot placement. One arm bent, one straight. Try: hand in pocket, hand on hip, touching your hair, adjusting a necklace, or holding a prop. Step forward with one foot. Natural asymmetry = stunning photos.
Bonus Tips:
Soft hands - Keep fingers slightly curved, never flat or stiff
If it bends, bend it - No stiff joints! Bend your elbows, knees, and wrists for natural-looking poses
Forehead forward and chin slightly forward - Very slight movement that creates flattering angles
Closest part of body to camera will appear larger - Use this to your advantage by angling your body

Within 2 weeks, you'll receive:
Your complete gallery of professionally edited images
High-resolution files ready to download and share
No stressful choosing—you get ALL the best shots!
Images perfect for everything you need them for
AFTER OUR SESSION:
What's Next
I Can't Wait to Capture This Amazing Time in Your Life!
I'll be there to guide you through every pose, every outfit change, and every moment. My goal is to make this the most fun, relaxed, and confidence-boosting experience possible.
Have questions about anything? Want a second opinion on your outfits? Need to adjust any session details? Just reach out—I'm here for you!
Can't wait to create magic with you!
AQH Comprehensive Shopping Guide

